How To Recover Deleted Videos On Mac

“The moments when I lost my video from Mac while I was editing it with another tool was a blunder. It happened because my Mac crashed for some unknown reason and dissolved the edited file too. What should I do now?” After finding such a query on our database, it became evident that people are searching the ways to recover deleted videos on Mac.
Regardless of the cause of getting the video deleted, whether, using human error or unexpected crash of the system, there are some good means to get back deleted videos. Let’s explore them one by one by scrolling through the blog below.
Best Ways To Recover Deleted Videos On Mac
Method 1: Recovering Videos Using Trash
In case you have deleted the video by dragging and dropping it into the trash bin, or simply pressing Command + Option + Delete button at the same time, there is still a good chance to get the deleted video back. Things that make it possible are not emptying the Trash and the file must be deleted in less than 30 days only. It is because your Trash gets deleted by itself 30 days later.
Step 1: Open Trash in your Mac.
Step 2: Locate the videos you want to restore. Now select all of these videos one by one.
Step 3: Right-click on them at a time and select ‘Put Back’.
Step 4: You will find the videos are already back in their original location after acting.
Through this simple step-by-step process above, recover videos on Mac instantly.
Must Read- 10 Best Video Converter For Mac
Method 2: Using A Video Recovery Software
When the above method does not work for you, it is time to go through a good video recovery software that makes it easy and quick for you to get the videos back. Such tools are highly recommended because they can help you deal with numerous situations and still find the deleted videos back in the system.
Although there are several recovery software available like EaseUS Data Recovery Wizard, Wondershare Recoverit for Mac, and Stellar data recovery, you are open to various options to get back deleted videos. However, we are explaining to you about EaseUS Data Recovery Wizard with all the steps to retrieve deleted files on Mac.
Make note of the fact that it is tough to recover videos on Mac if they are overwritten. This is why one should stop using a Mac as soon as they realize that the video has been deleted and it needs to be recovered back from here.
Read This- Best Duplicate Video Finders For Mac In
Features Of EaseUS Data Recovery Wizard For Mac
- Very easy to use with a simple and intuitive interface. Any new user could just download and start using it immediately.
- Several video formats are supported like MP4, AVI, MPEG, MPG, etc.
- It allows you to recover deleted videos on Mac from external drives, SD cards, DSLRs, flash drives, etc.
Recovering Deleted Videos On Mac Using EaseUS Data Recovery Wizard
Here is the step-by-step process for video recovery.
Step 1: Download and install EaseUS Data Recovery Wizard on Mac.

Get EaseUS Data Recovery Wizard on Mac From Here
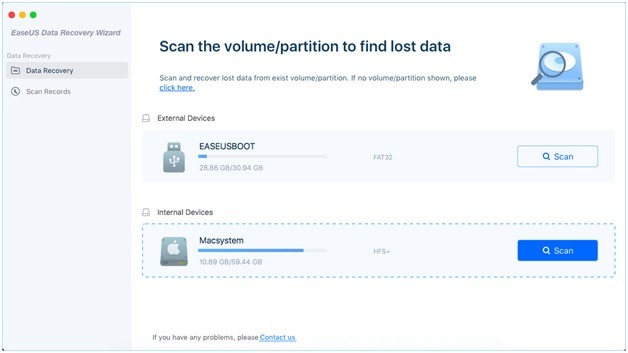
Step 2: Launch the application and select the location from where you want to recover your videos.

Step 3: Click the Scan button from the bottom right corner and the scanning process will begin.
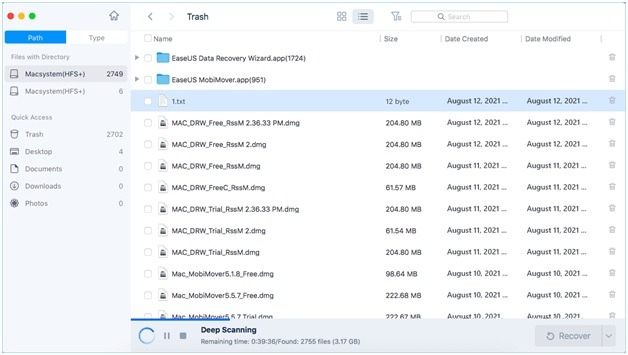
Step 4: As and when scanning is complete, you can notice the deleted videos in the scan result.
Step 5: It’s time to select the videos which you want to recover. You can also choose to recover all the videos or keep selected items for the recovery.

Step 6: Click the Recover button from the bottom right. You will notice that you can get back deleted videos on Mac easily.
Yes, EaseUS Data Recovery Wizard has got your back in terms of recovering videos back on your Mac. Let’s have a look at its pros and cons side by side for more clarity and understanding:
Pros:
- Clean and sleek interface with proper preview quality.
- Recovers unlimited data
- Offers fast scanning process
Cons:
- A selected folder scanning is not possible with the tool.
- Expensive when compared with others.
A free trial is offered with limited functionality after which you can purchase a package starting from $89.95 per month.
Read Also – 7 Best Video Repair Software For Mac
Method 3: Restore Deleted Videos On Mac Using Time Machine Backup

ime Machine backup is another savior you can rely on for recovering deleted files on Mac. However, you have to make sure that of things like:
- The Time Machine backup should be up to date and running to keep track of all the work.
- Your deleted videos must not be replaced by any other backed-up file.
- Your Time Machine backup drive should be connected to your Mac.
For recovering videos on Mac, follow the steps mentioned below.
Step 1: Click on Time Machine after opening System Preferences.
Step 2: Click ‘Enter Time Machine.
Step 3: Choose the location where deleted videos are saved.
Step 4: Locate the deleted videos and click on Restore.
On macOS, restore deleted files using the above method efficiently.
Also Read- 10 Best Video Recording Software For Mac
Wrap Up
We hope that your answer to the question of how to recover deleted videos on Mac is already found. Did you try any of the methods above? If so, which one worked best for you. Share your views with us in the comments below. Also, we recommend you to keep data recovery software handy in your system so that any file could be quickly recovered and restored on Mac before being overwritten by some other file.

 10 Best Duplicate File Finders for Mac In 2024
 Best Browser For Mac in 2024: Fastest & Lightest
 Best App Uninstaller For Mac In 2024
 Best Mac Hard Drive Clone Software In 2024
 10 Best Mac Temperature Monitor Apps In 2024