How To Start and Use Mac In Recovery Mode?

Mac Recovery Mode is not something you would use in your day-to-day work. However, knowing how to restart the Mac in Recovery Mode and how to use the various options that appear in Recovery Mode can be helpful when trying to troubleshoot issues on your Mac or when trying to wipe everything off before selling it to someone else.
In this post, we’ll broadly focus on –
- What is the Recovery Mode on Mac?
- What is the significance of various options in Mac Recovery Mode?
- How can you start your M1 or Intel-based Mac in Recovery Mode?
You can click on individual sections to acquire relevant information.
What Is Mac Recovery Mode?
As inferred from the name, Mac Recovery Mode is an inbuilt recovery system on your Mac. The recovery tools are loaded from a portion of your Mac’s hard disk that contains the copy of the macOS installer and recovery image. When in Recovery Mode, you can –
- Restore from Time Machine
- Reinstall macOS
- Get Help from Apple Support
- Repair or erase disk using Disk Utility
Significance of The Various Options In Recovery Mode

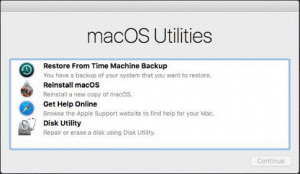
Have a look at the screenshot above. With regards to the screenshot, let’s quickly discuss how you can use the various options in Mac Recovery Mode –
1. Restore From Time Machine Backup: If you have enabled Time Machine and have backed up your data, you can restore it using this option. You can check out this post on how to use Time Machine on Mac.
2. Reinstall macOS: In case your current installation of macOS didn’t go as expected, or it is glitchy, you can conduct a fresh reinstall. We highly recommend that you first create a backup of your existing files.
3. Get Help Online: You can reach out to Apple Support through their website and get your issues fixed.
4. Disk Utility: With the Help of this option, you can fix various disk-related issues or even erase a disk if necessary.
Other Options That You Can Use in Mac Recovery Mode –
- Network Utility – With this app, you can fix network connections.
- Startup Security Utility – With this option, you can choose which operating system can run on your Mac. It includes settings that allow your Mac to boot from a trusted startup disk.
- Use Terminal – You can use the Terminal, which is Mac’s command-in-line interface. With the Terminal, you can perform advanced functions and perform changes that you won’t be able to normally.
What is The Need To Start Mac In Recovery Mode?
- Software not compatible with OS – If the new OS you have just upgraded to is incompatible with your software, you can conduct a fresh install using the macOS Recovery Mode.
- Go back to a previous version – Here, you can restore to an earlier version when everything was working fine, or you can even retrieve data that you may have accidentally lost.
- When selling Mac – Recovery Mode can help you wipe off every bit of data before selling it to someone else.
- Fix hard disk issues – The Disk Utility option can help you identify and fix any hard disk issues.
How To Start Mac In Recovery Mode?
Depending on the Mac you own – M1 or Intel-based Mac, here are the steps to restart a Mac in Recovery Mode –
– Starting an Intel-based Mac In Recovery Mode
1. Click on the Apple icon that you can see towards the top-left corner of your Mac’s screen.
2. Click on Restart
3. Immediately press the Command + R key combination till you can see the spinning globe or Apple logo. Wait till the macOS Utilities opens. If your Mac tries to open macOS Recovery via the internet, you will see the spinning globe.
– Starting an M1 Mac In Recovery Mode
1. Turn off your Mac.
2. Press and hold down your Mac’s power button. Eventually, you will be able to see the Apple logo stating that if you continue to hold the power button, you will be able to access the Startup Options.
3. Proceed by clicking on Options > Continue. You will now be able to start in Mac’s Recovery Mode.
Time Machine Wasn’t Enabled, How Do I Recover Data?
So, maybe you have restarted your Mac in Recovery Mode because you are facing grave issues or you want to wipe off your complete data for some reason. But, alas! You didn’t enable the Time Machine and can’t go back to a point where you can get back your files. How would you now recover files? Needn’t lose hope, you can use a data recovery software like EaseUS Data Recovery Wizard for Mac.
Fact: Almost 79% Apple users have downloaded EaseUS Data Recovery Wizard for Mac to recover lost files on Mac even when a Time Machine Backup wasn’t available.
How To Use EaseUS Data Recovery Wizard for Mac
1. Download, install and run EaseUS Data Recovery Wizard on your Mac.
Click Here To Install EaseUS Data Recovery For Mac
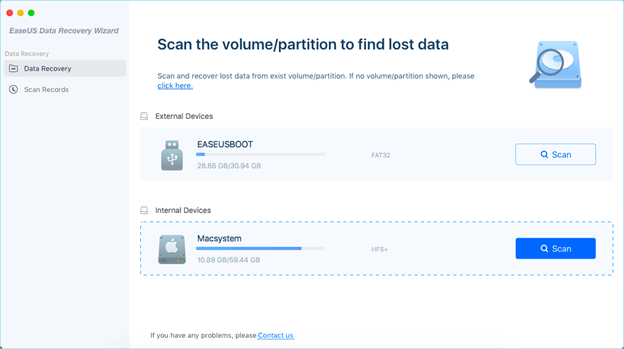
2. Specify the location from where you lost the data and choose a drive that you want to look for lost data and click on the Scan button.

3. You can now scan your Mac for lost files. Initially, a Quick Scan would be performed and then a Deep Scan will follow.

4. You can filter files and preview them so that you can restore the exact file you want.

Wrapping Up
If you ever had to restart your Mac in Recovery Mode, share your experience with us in the comment section below. Let us know what issue did you resolve. And, if you found the information in this post useful, don’t forget to share it with others who might find Mac Recovery Mode useful. For More such updates, keep reading Best Mac Tools.

 10 Best Data Recovery Software for Mac 2024
 How to Recover Deleted Data Files on Mac
 Best iPhone Data Recovery Software for Mac in 2024
 AnyRecover Data Recovery Software For Mac: Complete Review